This is the long awaited vehicle tactica that deals with different armor groups, notably the AV13 toys that Space Marines have to play with. One of the biggest follies in the 40K gaming community is that Predators and Vindicators suck because of their static nature and fixed firing ports. A lot of people see this as a weakness because these two tanks, as dominate as they are in the front arc with their AV13 hulls, have AV11 side armor. This means that every time they pivot and shoot, they're as durable as Rhino.
That must suck right? Wrong. This guide will show you the folly in your ways with some tested battle formations. I took all these pics using my iPhone since my attempts at MS Paint sucked harder than it should have. Keep in mind that this tactica is designed for a mechanized army. Some elements in this guide may or may not work depending on what you field.
 |
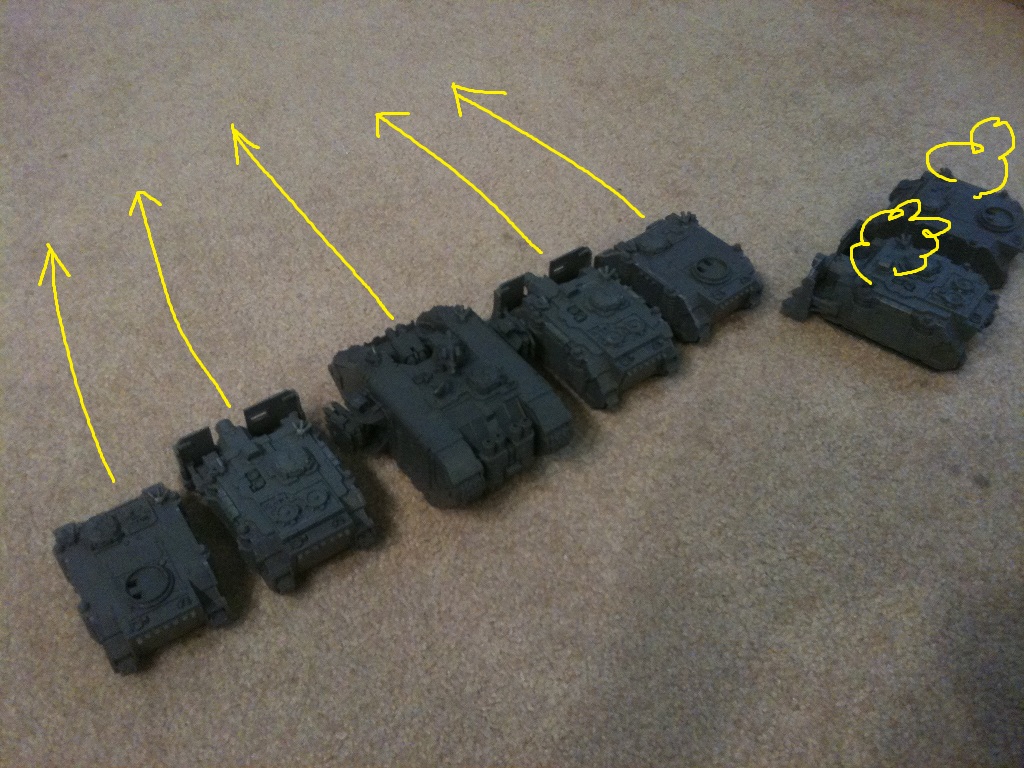
| Linebreaker formation, pushing up in force. |
So over here, you see the typical Linebreaker formation. Alternating armor values with everything moves up in a straight line. The entire army rotates and pivots with the Vindicators so their side armor of 11 is never exposed. The only way your enemies can take advantage of the side armor is if one of your Rhinos or LR explodes. You can even keep Vindicators next to wrecked Rhinos so they can take advantage of LoS and cover saves while limiting your opponents line of fire towards the AV13 front. With this formation and smoke, you'll find that you'll be all the way in mid-field in relative safety.
Here, you will see R-V-R-V-LR-V-R. Armor values are 11, 13, 11, 13, 14, 13, 11. Your heaviest guns and your biggest threats, will be AV13 and 14 when they push up the board. If you run into a building in the way, move your vehicles in a way that uses that building to deny a side shot. Think of the building as one big Rhino. You're essentially making a Vindicator sandwich with R-V-Building.
 |
| The Predator version of Linebreaker. |
Over here, you see the same formation but with Predators. My config of Predators is normally AC turret with LC sponsons. It's cheap and it's an effective firebase. Preds share the same AV13/11/10 stats as the Vindicator, so their methodology is similar in the fact they're still vulnerable in side shots. The main difference is that they have longer range, can play refused flank better and have the luxury of rotating turrets and sponsons. If the Predator ever needs to bring its full power into effect, it needs to rotate exactly like a Vindicator (to bring forth 2x Lascannons and the AC). Keep that in mind at all times.
Another thing to note is that Predators attract a lot less attention compared to Vindicators. No one wants a S10 AP2 Ordnance pie plate in their face and people will go to hell and back to see them destroyed. The humble Predator, however, is looked down upon. Nothing is better than to see your opponent's vehicles explode in white hot fury after they ignore that lone Predator in the corner of your army. But more on this later.
 |
| Full weight of fire assembled on the left while the right side moves for a flank. |
Lets say your opponent deployed all his armor and and heavy hitters on the left. You refuse armor flank like this and bring all your heavy guns to bear on his active side. The formation here is R-V-V-V-LR-R-R. With nothing but AV13 and 14 to shoot at in the center of your army and possibly exposing his flank to the LR and 2x Rhinos on the right, your opponent has better get his shit together. The yellow arrows shows a possible flank, but this entire army would probably move 12" and smoke first turn. BA Vindicators don't give a shit and can move 12" and start firing because they're fast. As awesome as it is to do so, always keep your AV13 facing the direction of the highest threat. The main objective is to preserve these bad boys and have them wreak maximum damage on the enemy while taking minimal damage in return. It's like Gun Kata, but with vehicles.
 |
| Spearhead formation pushing forward while a Vindicator and Rhino stays back as support. |
Check out this formation. It's the same Linebreaker formation we went over the first post, but this shows a tactical advance of the primary armored column while 2 vehicles remain to cover objectives (they smoked). The idea of armored lists is to saturate the field with a lot of threats. An LRC filled with angry Space Wolves, flanked by 2 Vindicators and 2 rabid Grey Hunter Rhinos is an enormous threat: Especially if the front armor is AV11-13-14-13-11. Do your opponents try to flank and risk getting shot by your Vindicator sitting in the back? Or do they try to fight your primary spearhead head on. Either way, your giving him a lot to think about in a short amount of time.
 |
| LoS blockers, cover saves, AV13 fronts, the works. |
Before you look at this and give up, read what I have to say carefully. Over here you'll see the armored column of vehicles rush into the fray while leaving Predators in the back as supporting fire. If the enemy is dead ahead, the return fire will be funneled into 2 realistic scenarios: Your opponent is forced to shoot at AV13 front, shooting through 50% of the vehicles so I get cover, or doing both of those.
The Red arrows show the Predators trajectory of fire. They didn't move from their starting locations, but they can pivot just fine. The Yellow arrows show what the rest of your dudes are doing; rushing forward to do battle with the enemy like real men.
As for your opponent, this is what's going to happen:
- The Green arrow shows what happens if your enemy is firing at the Pred A: 50% of the vehicle is covered by the LR and he's limited to front AV13 armor. Denied.
- The Blue arrow can't even draw LoS to the middle Pred, so he's limited to AV13 front armor at the Pred A. Denied.
- The Pink arrow has no shot at the Pred A at all and the rest of his Pred targets are AV13 in the front. Denied.
- The only possible shot comes from orange, because the shot has to be so accurately spaced and he'll be able to see side armor on Pred C. But then again, if you knew this was going to happen, you'll probably just space Preds B and C closer together, giving him AV13 while keeping everything else remains the same.
 |
| Refused flank formation using a building as an anchor. |
 |
| Refused flank deployment using the table edge and a building. |
Here are two examples of how to refuse flank deploy while keeping your tanks safe. The tide box is a building, so work with me here. Oh, and the random ass battery is the edge of the board. By the way this army was deployed, your opponents are limited to shooting at AV13 while the Predators have a pretty large covering zone. In the top pic, if the army wishes to advance towards the enemy, he can do so by moving his army parallel to the Predator's covering fire. This insures that the Predators keep shooting true while the enemy cannot outflank towards the left or right to get side armor shots. Keep in mind this leaves them vulnerable to deep strikers or outflankers.
In the bottom pic, the LR and the Rhinos are in a defensive formation with the LR blocking LoS on the floor level while preserving the Pred's AV13 front. The LR and the Rhinos can pounce towards the enemy at any time if they get close enough.
Another formation of deploying, and this doesn't have a picture, is spreading the Predators out all over the place. Since you shoot 48" with a pivot, you can sit back all day without relying on your tanks to baby sit them. This forces your opponents to direct their fire at 3 separate targets and thus exposing their side armor to you if they have a fixed arc. With a full spearhead of Space Marines coming towards them, 3 spread out Predators sitting in the back is the least of their worries. This formation, called the "lone hunter" formation should only be used if you're confident your opponent don't have the means to deal with you at 48" and that you're the primary aggressor (which you should be!).
 |
| Main force pushes upwards and around while Predators focus on left flank. |
 |
| LoS is blocked by the main force at ground level while Predators engage targets on the left. |
Check out these two. The first pic shows your iron column advancing on enemy positions while the Predators shift positions from their starting location to deal with .. say fast Skimmers. They pivot and bring their full power to bear while your army pushes on their objectives. If he closes towards your Preds, your tanks can change course, speed 12" and unleash hell with your troops inside. You also run the possibility of closing around your opponent all together and crushing him off the board.
The bottom pic is what happens when your opponent sends a flanking force left while keeping some of his AT in the front. You rush forward and pivot so your armor is forming a hard LoS blocker towards the enemy's incoming fire. Depending on how high he's positioned, he'll either be screwed out of luck completely from shooting the back Preds or barely draw LoS at all so you'll get a healthy cover save. Out of desperation, he shoots AT at the left most Pred which is going at his front arc of 13 and given a cover save because of the 50% block from the Rhino. If you smoke all your Rhino and LR in front this turn, and then rush into his face next turn, your giving him a real difficult decision to make. This formation is what you use to isolate and destroy flankers while preserving your own vehicles in battle.
 |
| Rhino moves back while Preds angle in a way to reduce incoming damage. |
I know you guys are used to seeing things move up and push up, but now it's time to show a defensive position with a step back. The Rhino marked with the Yellow arrow is stepping back to allow the Predators Pink and Red to engage different targets. Notice the angle of the Predators and notice that AV13 is all over the place with no side armor available. The upper most Rhino moves in to cover the side armor of the Red Pred while Blue is sandwiched nicely between the Rhino and LR. Marines don't retreat, they regroup. The same applies to their vehicles of war.
I'll probably be updating this and editing this this week so feel free to stop by and give me some comments.
No comments:
Post a Comment